How to Fix svchost.exe Memory Hogging Issue


Svchost.exe is actually a system process belonging to the Microsoft Windows Operating System. It handles processes executed from DLLs. Off late, Microsoft started moving all of the functionality from internal Windows services into .dll files instead of .exe files for the sake of better re-usability. However, this created a little problem as a .dll file cannot be executed directly. Thus, the svchost.exe process was born to facilitate running those .dll files.

What I observed was, the memory hogging issue cropped up only after I turned on Automatic Updates from Microsoft. Fix this issue and make your Windows run faster.

Instructions

1. Download Windows Update v3 WindowsUpdateAgent30-x86.exe and save it to your C:\ drive.

2. Download fix_svchost.zip and extract the zip and save the file to your C:\ drive.

3. Download WindowsXP-KB927891.exe (right click and choose save as..) and save it to your C:\ drive.

4. Reboot the PC and log in to Windows in safe mode. To do this, press F8 just before the Windows logo shows up during boot and press up to choose “Safe Mode”.

5. Login as the admin and Click Start > Run, choose the Browse button and find the fix_svchost.bat file you saved before, press Open, then OK.

6. A black screen will pop up and white text will scroll past. Wait for this process to finish as it could take several minutes. It will close itself when its finished.

7. Once the black screen disappears, Click Start > Run, choose the Browse button and find the WindowsUpdateAgent30-x86.exe file you saved before, press Open, then OK. Follow the prompts as it installs.

8. When Windows Update Agent finishes installing, Click Start > Run, choose the Browse button and find the WindowsXP-KB927891.exe file you saved before, press Open, then OK. Follow the prompts as it installs and reboot the PC.

That’s it, you are done!

DOWNLOADS INCLUDED:

1.    WindowsUpdateAgent30-x86.exe
2.    fix_svchost.zip
3.    WindowsXP-KB927891.exe

Click Here to Download Tool

Download

How to Login When You Forget Your Windows Password


What happens if the administrator password is lost when demanded on login screen. Do the following steps to recover from such a hassle situation.

1. With your Windows XP CD in the cd-rom drive and boot your compute

2. Press any key when you read “Press any key to boot from cd” on the screen

3. The first screen will indicate that Setup is inspecting the system hardware and loading files

4. When you get to the Welcome screen, press ENTER to Setup Windows now

5. Press F8 to accept the Licensing Agreement

6. The next screen gives you the option to start a Repair process. Use the arrow keys to select your XP installation (if you only have one, it should already be selected) and press R to begin the Repair process

7. Setup will now check your disks and then start copying files which can take several minutes. Shortly after this stage you will be required to reboot

8. During the reboot do not press any key to boot from the CD again. Setup will resume automatically with the standard screen

9. Keep your eye on the lower left hand side of the screen. When you see the Installing

10. Devices progress bar, press SHIFT + F10. A command console will now open up giving you a wide access to the system

11. At the prompt, type NUSRMGR.CPL and press Enter. You have gained graphical access to your User Accounts in the Control Panel

12. Now remove or change your password as you prefer. Once the Repair is done, you will be able to log on with your new password. Your programs and personalized settings should remain intact.

How to Capture Screenshots from a Video in Windows Media Player


This solution should only be used to capture images from any video; once done, it should be changed back as it may cause other issues. However, this should work with all types of video files.

simple way to capture Images from Windows Media Player
  • Open Window Media Player
  • Then go to Tools >>  Options
  • In Options, select the Performance Tab
  • Way below you click on the Advanced Button
  • Uncheck “Use Overlays’
  • Click Ok
  • And you are ready.
Now run your movie in any size or screen resolution. Use the standard ‘Print Screen Key’ Method as described and you have captured a snapshot from your favorite movie on windows media player without using any special multimedia software.

Once you've pressed print screen it should be sent to the clipboard and allow you to paste that file into another program. If it is not working properly in your image editor program try pasting the screen shot into Microsoft Paint.

Finally after you have captured the screen shot repeat the same above steps however check the "User Overlays" box to re-enable this feature.

Disable XP Boot Logo


It is possible to disable XP splash screen, which will slightly speed up the overall boot process. Be aware that removing the splash screen will also cause you not to see any boot-up messages that might come up (chkdsk, convert … ), but if your system runs without any problems then it should not matter.

Step  -  1  

01. Edit boot.ini

02. Add ” /noguiboot” right after “/fastdetect”.
(or check the /noguiboot switch in msconfig on the boot.ini tab)

Upon restarting, the splash screen will be gone. It can be re-enabled by removing the new switch.

Step  -  2  

click Start > >  Run and type in ‘msconfig’ (without the quotes) and click OK.


The System Configuration Utility will open, now click on the BOOT.INI tab.  From the list under Boot Options place a check mark next to “NOGUIBOOT” and click OK.


Upon restarting, the splash screen will be gone.

Run Commands


Do you use the Run feature in Windows XP? The main reason most people don't use the Run feature is because they don't know the Commands. Getting used to using your keyboard exclusively and leaving your mouse behind will make you much more efficient at performing any task on any Windows system.

Type the following commands in your Run Box (Windows Key + R) or Start Run

  • excel = Microsoft Excel (If Installed)
  • msaccess = Microsoft Access (If Installed)
  • powerpnt = Microsoft PowerPoint (If Installed)
  • winword = Microsoft Word (If Installed)
  • frontpg = Microsoft FrontPage (If Installed)
  • notepad = Notepad
  • wordpad = WordPad
  • acrobat  =  Adobe Acrobat (if installed)
  • charmap  =  Character Map
  • calc = Calculator
  • msmsgs = Windows Messenger
  • mspaint = Microsoft Paint
  • wmplayer = Windows Media Player
  • rstrui = System Restore
  • netscp6 = Netscape 6.x
  • netscp = Netscape 7.x
  • netscape = Netscape 4.x
  • waol = America Online
  • control = Opens the Control Panel
  • control printers = Opens the Printers Dialog
  • devmgmt.msc = Device Manager
  • msinfo32 = System Information
  • cleanmgr = Disk Cleanup
  • ntbackup = Backup or Restore Wizard (Windows Backup Utility)
  • mmc = Microsoft Management Console
  • folders  =  Folders Properties
  • fonts  =  Fonts control / Fonts Folder
  • javaws  =  Java Control Panel (if installed)
  • winchat  =  Microsoft Chat
  • control netconnections  =  Network Connections
  • ncpa.cpl  =  Network Connections
  • netsetup.cpl  =  Network Setup Wizard
  • regedit  =  Registry Editor
  • regedit32  =  Registry Editor
  • shutdown  =  Shuts Down Windows
  • shutdown -a  =  Stop Shuts Down
  • sysedit  =  System Configuration Editor
  • msconfig  =  System Configuration Utility

Creating Your Own Run Commands

If you are like me, you will use a few programs very frequently. One way to make them start faster is to give them their own Run command:

   1. Win+R to open the Run dialog
   2. Enter %windir% to open the Windows directory
   3. Alt+F W S to open the File menu, choose the New menu item, then the Shortcut menu item
   4. Go through the wizard to create a shortcut to the desired program
   5. The name you give the shortcut is what you type in the Run dialog to start the program

Top Ten Tips To Improve your Computer Speed


1. Let your PC boot up completely before opening any applications.


2. Refresh the desktop after closing any application. This will remove any unused files from the RAM.


3. Do not set very large file size images as your wallpaper. Do not keep a wallpaper at all if your PC is low on RAM (less than 64 MB).


4. Do not clutter your Desktop with a lot of shortcuts. Each shortcut on the desktop uses up to 500 bytes of RAM


5. Empty the recycle bin regularly. The files are not really deleted from your hard drive until you empty the recycle bin.


6. Delete the temporary internet files regularly.


7. Defragment your hard drive once every two months. This will free up a lot of space on your hard drive and rearrange the files so that your applications run faster.


8. Always make two partitions in your hard drive. Install all large Software (like PSP, Photoshop, 3DS Max etc) in the second partition. Windows uses all the available empty space in C drive as virtual memory when your Computer RAM is full. Keep the C Drive as empty as possible.


9. When installing new Softwares disable the option of having a tray icon. The tray icons use up available RAM, and also slow down the booting of your PC. Also disable the option of starting the application automatically when the PC boots. You can disable these options later on also from the Tools or preferences menu in your application.


10 Protect your PC from dust. Dust causes the CPU cooling fan to jam and slow down thereby gradually heating your CPU and affecting the processing speed. Use compressed air to blow out any dust from the CPU. Never use vacuum.

Creating ISO Images in Linux


In windows XP, you would most probably use DVD/CD burning software such as Nero or DeepBurner to make iso images, and software like alcohol 120% or daemon tools to mount the images.

In linux, you can use the commandline to both make and mount iso images.
Firstly, the program ‘dd’ which comes standard on any linux distro can be used to make an iso image. the program syntax is relatively simple, here is an example that would make an iso image of my cdrom0 drive and save it in my home folder as backup_image.iso:

dd if=/dev/cdrom0 of=~/backup.iso
now to explain the command,

The first bit “dd” is the program name (note: dd stands for dataset definition, not data dump as it is mistakenly known as).

The next part of the command “if=/dev/cdrom0? specifies the input for the program, in this case it is the device cdrom0 (my first CD/DVD drive)

The last bit of the command “of=~backup.iso” specifies the output path and name for the program, in this case the output is a file named backup.iso that is stored in my home directory. the tilde (~) specifies the home directory.

So there you go, a relatively simple method of creating an iso file in linux. You can even put this in a bash script and have the iso file tarballed and gziped and sent off to your file server for archiving, but thats for another article to cover.

The command dd has many more options than what I have shown such as the ability to select block size and write at a certian number of bytes at a time, all these options grant dd great flexibility. Infact, you could use dd to backup entire harddrives and make 1:1 copies of their filesystems. Even damaged drives can be recovered somewhat using dd as it is low-level and works with the raw data on the drive.

Now that you know how to make iso images using dd, you will want to know how to mount them. In linux this is easily achieved using the ‘mount’ command. The first thing you will want to do however, is to create a mount point for your iso image, so as root go ahead and create a directory named iso in /mnt. try using this command if your distro supports sudo -

sudo mkdir /mnt/iso
this creates a directory named iso in your /mnt directory , we will use this directory as a mount point for out iso image.

Now mount the image -

sudo mount -o loop ~backup.iso /mnt/iso
This command mounts the backup.iso file found in your home directory to the mount point /mnt/iso the -o loop part of the command allows the iso file to be treated as a block device.

Now that you have mounted the iso, go to your /mnt/iso directory and you should see that the iso contents are readable and usable. :D

To unmount the iso image, type in this command :

umount ~backup.iso

How to Fix the Master Boot Record on NTFS Partitions

Windows NT, 2000, XP, and Windows Server 2003 users having problems accessing or booting from an NTFS disk can use the FIXMBR program to rewrite a new Master Boot Record on the hard drive.

FIXMBR is available only through the Recovery Console feature of Windows NT, 2000, XP, or Windows Server 2003. To access the Recovery Console, you must boot up with recovery diskettes you made during installation of the OS or select the recovery options from the installation CD. FIXMBR has one function, just like DOS's FDISK /MBR: to write a new Master Boot Record on the disk drive.

To use FIXMBR follow these steps:

  • Boot using your Recovery diskettes or setup CD and select the Recovery Console option.
  • Log on to the drive/partition you wish to repair, typically C:\WINNT or C:\WINDOWS.
     
  • At the command prompt, issue the MAP command to determine the device name for the disk partition you want to "fix"—typically it will be \Device\HardDisk0.
  • At the command prompt, issue the FIXMBR command followed by the name of the disk partition to be "fixed." For example (press Enter after the command):
fixmbr \Device\

HardDisk0
  • Type exit to leave the Recovery Console and restart the system.

How to Convert FAT Partition to NTFS

CONVERT is a command-line program with one simple function: to change a FAT partition to NTFS. Normally CONVERT applies user and system security settings to all of the files in the partition, but the command-line option /NoSecurity leaves the access rights to all files open to everyone, as if the partition were an unsecured FAT partition.

To use CONVERT to make your C: drive NTFS:
  • Click Start, then Run. Type in CMD or open a Command Prompt window.
  • At the command prompt type: convert c:\ /fs:ntfs
  • If the partition has a volume label, you will be prompted to type it in.
  • Press Y to proceed. If this partition is also the system root, you will see a message telling you the partition will be converted at the next reboot.
  • Close all open programs and restart your PC. Convert will run CHKDSK to verify the contents of the partition and then begin the conversion. After conversion the system will restart with the new partition.

Crimping (How to make your own network cable - UTP / STP)

LANS SIMPLIFIED.  A LAN can be as simple as two computers, each having a network interface card (NIC) or network adapter and running network software, connected together with a crossover cable


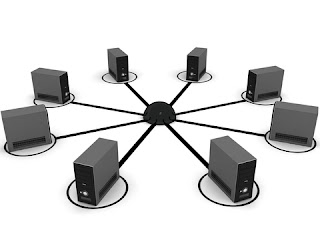
The next step up would be a network consisting of three or more computers and a hub.  Each of the computers is plugged into the hub with a straight-thru cable (the crossover function is performed by the hub).


Tools You Need


OK! now we know the tools, lets talk about the cables, we are making cable according to UTP CAT5 Standards.
  • Straight-thru cable (PC TO HUB/SWITCH) : Both ends are same.

  • Crossover cable (PC TO PC) : Two ends are different


  • After striping spread the cable

  •  After arranging the wires according to Straight-thru or Crossover you must cut off the wire ends to straighten it up.
  • After straitening the stripped part should be 1/2"
  •  Then you thoroughly insert the cable in to the RJ 45 connector.

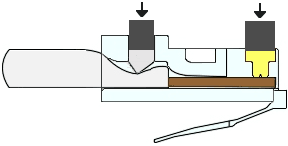
  • After inserting double check the pattern then crimp it. When it's crimped you can't reuse the RJ 45 connector.
This is the way it should be crimped.

 COLOR-CODE STANDARDS

Again, please bear with me...  Let's start with simple pin-out diagrams of the two types of UTP Ethernet cables and watch how committees can make a can of worms out of them.  Here are the diagrams:
 

Note that the TX (transmitter) pins are connected to corresponding RX (receiver) pins, plus to plus and minus to minus.  And that  you must use a cossover cable to connect units with identical interfaces.  If you use a straight-through cable, one of the two units must, in effect, perform the cross-over function.
Two wire color-code standards apply: EIA/TIA 568A and EIA/TIA 568B. The codes are commonly depicted with RJ-45 jacks as follows:

 
If we apply the 586A color code and show all eight wires, our pin-out looks like this:


Cabling Rules

  1. Try to avoid running cables paralles to power cables.
  2. Do not bent cable to less than four times the diameter of the cable.
  3. If you bundle a group of cables together with cable ties (Zip ties), do not over-cinch them. Its okay to snug them together firmly, but don't tighten them so much that you deform the cables.
  4. Keep cables away from devices which can introduce noise into them. Here's a short list copy machines, electric heaters, speakers, printers, TV sets, fluorescent lights, copiers welding machines, microwave ovens, telephones, fans, elevators, motors, electric ovens dryers, washing machines and shop equipment.
  5. Avoid stretching UTP cables (tension when pulling cables should not exceed 25 LBS).
  6. Do not run UTP cable outside of a building. It presents a very dangerous lightning hazard. 

Cable tester result

Boot Process of Windows XP


The bootup process is a list of detailed procedures that the system undergoes to perform all system checks and load all necessary files to bring the computer to an operable state.

The Windows XP bootup process comprises of the following procedures:

Windows XP Professional boot process occurs in five stages.
  • Preboot sequence
  • Boot sequence
  • Kernel sequence
  • Kernel initialization
  • Logon
Files used in the Windows XP Professional Boot Process are as follows:


File Location Boot Stage
NTLDR System partition root (c:\) Preboot and boot
BOOT.INI System partition root Boot
BOOTSECT.DOS System partition root Boot (optional)
NTDETECT.COM System partition root Boot
NTBOOTDD.SYS System partition root Boot (optional)
NTOSKRNL.EXE Systemroot\System32 Kernel load
HAL.DLL Systemroot\System32 Kernel load
SYSTEM Systemroot\System32 Kernel initialization
Device drivers (.sys) SYSTEMROOT\System32\Drivers Kernel initialization

During start up, a computer running Windows XP Professional initializes and then locate the boot portion of the hard disk.
The following four steps occur during the preeboot sequence.
  1. The computer runs power-on self test (POST) routines to determine the amount of physical memory, whether the hardware components are present, and so on. If the computer has a Plug and Play BIOS, enumeration and configuration of hardware devices occures at this stage.
  2. The computer BIOS locates the boot device and loads and runs the master boot record (MBR).
  3. The MBR scans the partition table to locate the active partition, loads the boot sector on the active partition into memory, and then execute it.
  4. The computer loads and initializes the NTLDR file, which is the operating system loader. Windows XP Professional setup modifies the boot sector during installation so that NTLDR loadsduring system start up.
 Boot Sequence

After the computer loads NTLDR into memory, the boot sequence gather information about, hardware and drivers in preparation for the Windows XP Professional load phases. The boot sequence uses the following files: NTLDR, BOOT.INI, BOOTSECT.DOS (optional), NTDETECT.COM, and NTOSKRNL.EXE.
The boot sequence has four phases:
  • Initial boot loader phase
  • Operating system selection
  • Hardware detection
  • Configuration selection
After configuration selection, the Windows XP Professional kernel (NTOSKRNL.EXE) loads and initializes. NTOSKRNL.EXE also loads and initializes device drivers and loads services. If you press Enterwhen the Hardware Profile/Configuration Recovery menu appears, or if NTLDR makes the selection automatically
  • Loads NTOSKRNL.EXE but does not initialize it.
  • Loads the Hardware abstraction layer file (HAL.DLL)
  • Loads the HKEY_LOCAL_MACHINE\SYSTEM registry key  from %systemroot%system32\config\system.
  • Select the control set it will use to initialize the computer. A control set contains configuration data used to control the system, such as a list of the device drivers and services to load and start.
  • Loads device drivers with a value of 0x0 for the start entry. These typically are low-level hardware device drivers, such as those for a hard disk. The value for the List entry, which is specified in the HKEY_LOCAL_MACHINE\SYSTEM\CurrentControlSet\Control\ServiceGroupOrder subkey of the registry, defines the order in which NTLDR loads these device drivers.
When the kernel load phase is complete, the kernel initializes, and then NTLDR passes control to the kernel. At this point, the system displays a graphical screen with a status bar indication load status. Four tasks are accomplished during the kernel initialization stage:
  • The Hardware key is created.
  • The Clone control set is created.
  • Device Drivers are loaded and initialized
  • Services are started.
The logon process begins at the conclusion of the kernel initialization phase. The Win32 subsystem automatically stars WINLOGON.EXE. which starts the Local Security Authority (LSSASS.EXE), and displays the Logon dialog box. You can log on at this time, even though Windows XP Professional might still be initializing network device drivers. Next, the Service Controller executes and makes a final scan of the HKEY_LOCAL_MACHINE\SYSTEM\CurrentControlSet\Services subkey, looking for services with a value of 0x2 for the start entry.

    How to Configure Gmail for Outlook 2007


    Step - 1

    • Log into your Gmail account via your web browser.
    • Click on the "Settings" in the upper right corner of the Gmail page.
    • In "Settings, "click the "Forwarding and POP/IMAP" tab.


    • Locate the "IMAP Access" section. Click the "Enable IMAP" radio button.


    • Click "Save Changes." Your Gmail account is now ready to be configured in Outlook 2007.

    Step - 2

    Configuring Outlook 2007 for Gmail Access

    Informations

    You can use the following information to configure IMAP with many mail clients.


    Incoming Mail (IMAP) Server - requires SSL: imap.gmail.com
    Use SSL: Yes
    Port: 993
    Outgoing Mail (SMTP) Server - requires TLS: smtp.gmail.com (use authentication)
    Use Authentication: Yes
    Use STARTTLS: Yes (some clients call this SSL)
    Port: 465 or 587
    Account Name: your full email address (including @gmail.com) Google Apps users, please enter username@your_domain.com
    Email Address: your full Gmail email address (username@gmail.com) Google Apps users, please enter username@your_domain.com
    Password: your Gmail password


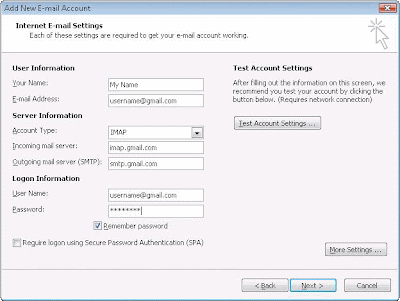
    To set up your Outlook 2007 client to work with Gmail:
    • Enable IMAP in Gmail. Don't forget to click Save Changes when you're done.
    • Open Outlook.
    • For new setups, select Do not upgrade.
    • Click Yes.
    • Enter your display name, email address (including '@gmail.com'), and password. Google Apps users, enter your full email address, e.g. 'username@your_domain.com.'
    • Select the 'Manually configure server settings or additional server types' check box.


    • Select Internet E-mail.
    • Settings: name, full email address (including '@gmail.com' or '@your_domain.com')
    * In the Account Type dropdown menu, select IMAP; enter the incoming and outgoing server names shown below.
    * In the 'User Name' field, give your full Gmail address, including '@gmail.com' or '@your_domain.com.'
    * After creating these settings, clicking Next takes you to the end of the setup.


    • In the Tools menu, select Options then Mail Setup. Under 'Email Accounts,' click E-mail Accounts.
    • Select an account, and click Change above the list of accounts. Click More Settings, then the Advanced tab.
    * Incoming server must be 993, and must use SSL encryption.
    * Outgoing server can use 587, TLS encryption.


    • Click the Outgoing Server tab. Make sure that 'My outgoing server (SMTP) requires authentication' is selected. The radio button 'Use same settings as my incoming mail server' should also be selected.


    • Click OKNextFinishCloseOK.

    Windows Backup (NT Backup)

    Backup is a disaster recovery method. A copy of existing data is taken and kept in a separate place. A necessary is raced the backup could be restored.

    NTBackup is the built-in backup command of Microsoft Windows, introduced in Windows NT around 1997 and part of all subsequent versions up to and including Windows 2000, Windows XP and Windows Server 2003. It uses a proprietary backup format (BKF) (also known as "Microsoft Tape Format" or MTF) to back up files. Files can be backed up to tape, ZIP drives, floppy disks, and hard drives. It also features integration with Task Scheduler and has several command line switches for scheduled automated backups.

    In Windows Vista and later operating systems, NTBackup was replaced by Windows Backup and Restore Center, which uses the Virtual Hard Disk (VHD) file format, supports backup to modern media such as DVDs and image-based full system backups. For More


    ** When performing a backup in Microsoft "NT Backup", make sure to close all the files. as any open a file during a backup will not be backup.

    Permissions for backup

    Administrator / Backup Operator  → Full Control for backup & Restore

    System State Data
    • Registry Settings
    • Drivers
    • System Files
    • Active Directory Database (only in a Domain Controller)
    ** System State Data can only will backup locally (not over the network)

    Steps

    Go to RUN → Type ntbackup → Enter → Click Next


    Select "backup Files & Settings" → Click Next


    Select "Let me choose what to backup → Click next


    Tick Files, what you want to backup → Click Next


    Select Backup Location & Type Backup Name → Click Next


    Click Finish


    Learn about Windows Event Viewer


    Event Viewer

    This is like the log book of a system. An entry against any action takes place is logged here.
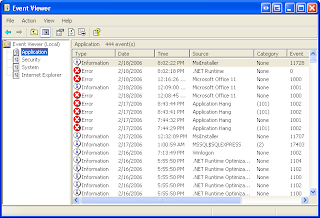
    There are three types of log in the Event Viewer.
    • Application : any action related to the applications of the system are logged here.
    Ex: installation of MS Office
    • System : The system while changes make in the computer are logged here.
    Ex: changing system time
    • Security : Entries against security related issues of the system are saved here.


    How to View Event Logs To open Event Viewer, follow these steps:
    1. Click Start, and then click Control Panel. Click Performance and Maintenance, then click Administrative Tools, and then double-click Computer Management. Or, open the MMC containing the Event Viewer snap-in.
    2. In the console tree, click Event Viewer.

    There are 3 types of log entries based on the information that they contain
    • Information - The non critical events take place in the system.
    Ex : The installation of Acrobat Reader
    • Warning - This is an issue of the system which has not yet developed in to an error.
    Ex: IP conflict (same IP address in two computers)
    • Error - A warning may be developed in to a fatal error if no correctly action in place.
    Ex : Contraption of a system tray

    For More Detail - http://support.microsoft.com/kb/308427

    How to Configure Remote Desktop Connection

    Configuring Remote Desktop

    With the Remote Desktop feature in Windows XP, you can remotely control a computer from another office, from home, or while traveling. This allows you to use the data, applications, and network resources that are on your office computer, without being in your office. In the Illustration below, you can see that an Systems Administrator can quickly (and securely) get into their corporate offices and do that, system down, no problem, you can fix from anywhere you can find an Internet connection that is stable enough to let you work. For more
    • Creating User Accounts
    Right Click on My Computer → Select manage


    Local users & Groups → Users → Right Click On Users & Select New User


    Type the User name & Password → Tick for the account options → Create


    • Remote Desktop
    * Enabling in coming Remote Connections

    Right Click on My Computer → Properties


    Remote → Tick to allow users to remotely connect to this computer option → click OK for the notification → Click apply


    * Creating Remote Desktop Connection

    Click Start → All Programs → Accessories → Communications → Remote Desktop Connection


    Type the destination computer name or IP address & click connect → type user name and password→ OK

    Implementing a WORKGROUP Network


    What is a workgroup?

    A workgroup is a grouping of computers that are connected to each other over a network. This grouping is handled within the Microsoft® Windows® operating system, where the members of the workgroup assume the same workgroup name (though each computer in a workgroup must have a unique computer name). Computers in a workgroup communicate directly with each other and do not require a server to manage network resources.

    A workgroup might be created for use in a home or small office network, so that different computers can more easily share files, printers, and other network resources.

    Once a workgroup has been created, it is visible in My Network Places (available from the desktop in Windows). The ability to see a whole workgroup simplifies the viewing and accessing of shared resources.
    --------------------------------------------------------------------

    To perform the followings, before you must login as the Administrator
    • Configuring IP Address
    Right Click on My Network Places → properties


    Right Click Local Area Connection → properties


    Highlight TCP/IP & click Properties


    Select "use the following IP Addresses" → Type a proper IP Address & click in the Subnet mask area to get Subnet mask automatically → Click OK → Click Close


    • Changing computer Names and adding computers to a Workgroup

    Right Click on the My Computer
    → Properties


    Select Computer Name → Change → Type a Unic computer name & a similar workgroup name → Click OK


    click OK for the Welcome message & click OK for notification message → Restart

    ** Do this configuration for all computer