Showing posts with label Linux Network Administration. Show all posts

Detect and Avoid IP Address Conflicts


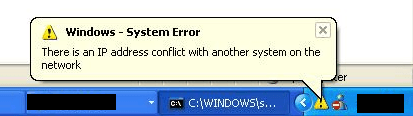
IPv4 address conflicts are a common cause of problems with DHCP. No two computers on the network can have the same unicast IP address. If a computer is assigned the same unicast IPv4 address as another, one or both of the computers might become disconnected from the network.

To better detect and avoid potential conflicts, you can enable IPv4 address conflict detection by following these steps:

1. In the DHCP console, expand the node for the server you want to work with, right-click IPv4, and then click Properties.

2. On the Advanced tab, set Conflict Detection Attempts to a value other than 0. The value you enter determines the number of times the DHCP server checks an IP address before leasing it to a client. The DHCP server checks IP addresses by sending a ping request over the network.

Real World Example: A unicast IPv4 address is a standard IP address for class A, B, and C networks. When a DHCP client requests a lease, a DHCP server checks its pool of available addresses and assigns the client a lease on an available IPv4 address. By default, the server checks only the list of current leases to determine whether an address is available. It doesn’t actually query the network to see whether an address is in use.

Unfortunately, in a busy network environment, an administrator might have assigned this IPv4 address to another computer or an offline computer might have been brought online with a lease that it believes hasn’t expired, even though the DHCP server believes the lease has expired. Either way, you have an address conflict that will cause problems on the network. To reduce these types of conflicts, set the conflict detection to a value greater than 0

Creating ISO Images in Linux


In windows XP, you would most probably use DVD/CD burning software such as Nero or DeepBurner to make iso images, and software like alcohol 120% or daemon tools to mount the images.

In linux, you can use the commandline to both make and mount iso images.
Firstly, the program ‘dd’ which comes standard on any linux distro can be used to make an iso image. the program syntax is relatively simple, here is an example that would make an iso image of my cdrom0 drive and save it in my home folder as backup_image.iso:

dd if=/dev/cdrom0 of=~/backup.iso
now to explain the command,

The first bit “dd” is the program name (note: dd stands for dataset definition, not data dump as it is mistakenly known as).

The next part of the command “if=/dev/cdrom0? specifies the input for the program, in this case it is the device cdrom0 (my first CD/DVD drive)

The last bit of the command “of=~backup.iso” specifies the output path and name for the program, in this case the output is a file named backup.iso that is stored in my home directory. the tilde (~) specifies the home directory.

So there you go, a relatively simple method of creating an iso file in linux. You can even put this in a bash script and have the iso file tarballed and gziped and sent off to your file server for archiving, but thats for another article to cover.

The command dd has many more options than what I have shown such as the ability to select block size and write at a certian number of bytes at a time, all these options grant dd great flexibility. Infact, you could use dd to backup entire harddrives and make 1:1 copies of their filesystems. Even damaged drives can be recovered somewhat using dd as it is low-level and works with the raw data on the drive.

Now that you know how to make iso images using dd, you will want to know how to mount them. In linux this is easily achieved using the ‘mount’ command. The first thing you will want to do however, is to create a mount point for your iso image, so as root go ahead and create a directory named iso in /mnt. try using this command if your distro supports sudo -

sudo mkdir /mnt/iso
this creates a directory named iso in your /mnt directory , we will use this directory as a mount point for out iso image.

Now mount the image -

sudo mount -o loop ~backup.iso /mnt/iso
This command mounts the backup.iso file found in your home directory to the mount point /mnt/iso the -o loop part of the command allows the iso file to be treated as a block device.

Now that you have mounted the iso, go to your /mnt/iso directory and you should see that the iso contents are readable and usable. :D

To unmount the iso image, type in this command :

umount ~backup.iso

How To Share a Folder Through SAMBA


  • Create a folder to share
# cd /
# mkdir data → folder name

  • Sharing the folder using SAMBA
# nano /etc/samba/smb.conf

** Go to end of file to new line and type following

[my data share] → Share name
path = /data → folder to share
public = yes → any SAMBA user can access the folder
writable = yes → all SAMBA users can write in to the folder

  • Reload the service
# service smb reload

Although we have given writable SAMBA permissions to all SAMBA users want to be able to write in to it from windows . Unless we change ext3 file folder permission.

# cd /
# ls -ld data → folder name
# chmod 757 data → normal way
# ls -ld data

Configuring a Windows File Server (SAMBA Server)


What is SAMBA Server?

Samba is an implementation of a Common Internet File System (CIFS, also known as SMB) protocol server that can be run on almost every variant of Unix in existence.
Microsoft clients will use this protocol to access files and printers located on your Unix
box just as if it were a native Windows server.

Samba is an open source project, just like the Linux kernel (a Unix-like operating system
for PCs). The source code, written in C, is always available to you to explore, test, or
change. And it’s free!

The implication of these items is that Samba is being installed in more and more server
rooms in order to provide file and print services to Microsoft Windows clients without
installing a Windows NT/2000 Server or any other CIFS server.

STEPS
  • Check the RPM - # rpm -q samba
  • Set the SAMBA work group name according to windows work group or domain name
# nano /etc/samba/smb.conf

* press Ctrl+W & find the word mygroup.
* Remove mygroup and type windows work group name or domain name.
* Save & Exit
  • Start the SAMBA Service
# service smb start
# chkconfig smb on

Now you will be able to see the SAMBA Server through My Network Places in windows, but to access the SAMBA server. We have to have windows compatible user accounts in Linux. That is also known as SAMBA user accounts.

* You must have a Linux user accounts.
* The Linux server accounts you can convert to SAMBA.

# smbpasswd -a user1 → (user name)

New Password → Give windows compatible password

Now users can access their Linux Home folder through Windows. Because by default the User's Home Folder will be automatically shared, when we add the user to SAMBA.

Download SAMBA RPM - http://samba.xsec.it/

File / Folder Searching Commands

To locate all data (personal / system data)

# locate objectname

Example: #locate splash.xpm.gz

# locate splash

# find location search parameter object name
# find / -name 'splash.xpm.gz' or # find / -name 'splash*'

To locate system data only

# whereis system file name

Example: #whereis inittab

# which system command name

Example: #which mount

How to Mount Storage Devices in Linux

Mounting a Rom Drive (CD/DVD/CD-RW/DVD-RW)
  • Create a mount point - empty folder to load the data structure of a Storage Device.
# mkdir /media/mycd → (mount point name)
#
ls /media

Mounting
  • Put the CD in to ROM Drive
# mount /dev/cdrom /media/mycd
# cd /media/mycd

# ls -l


To take out the CD (Eject)

# eject
# eject -t


Mounting the FDD
  • Create a mount point
# mkdir /media/myfdd → (mount point name)

Mounting
  • Put the Floppy in to the FDD
# mount /dev/floppy /media/myfdd
# cd /media/myfdd
# ls -l
  • Before you take the floppy out
# unmount /media/myfdd

Mounting a USB Storage Device

Once you fix the USB Drive, It will be automatically detected as a SCSI Storage Device.
Example : dev/sda
  • Create a mount point
# mkdir /media/myusb → (mount point name)
# ls /media
  • Mount
# mount /dev/sda1 /media/myusb
# cd /media/myusb
# ls -l
  • before you unplug the USB Drive
# unmount /media/myusb

Linux Basic Commands


Commands
  1. BASH Commands (Shell Commands)
  2. Application Commands


  • sbin → System Binary
  • bin → Binary
* To see shell commands, type (help)
** ¦ more → fit the output to screen
Ex: help
¦ more

* To see Shell and Application Commands.
** Login as root and press Tab key Three times.

* How to check commands (Is it Shell or Application command)
** type -a command name
Ex: type -a logout

* How to see details of commands (Shell Description)
** whatis command name
Ex: whatis cal

Long Description
man command name Ex: man cal


Directory Browsing and listing Commands

■ To see the current location of a user
  • Command → pwd (Print Working Directory)
■ To see the contents of current folder
  • Command → ls or tree
■ object color codes (files and folders)
  • White text base files
  • Dark blue folders
  • Green executable file (or any file to copied from Windows to Linux)
  • Purple multimedia files
  • Orange device driver files
  • Red → compressed files
  • Light Blue → short cuts
Object Rename

command → mv
Syntax → mv_current_object name_new object name

Ex: mv folder1 folder2

Moving Objects

command → mv
Syntax
→ mv_object name_new location name
Ex: mv folder1 /home

Deleting Objects

command → rm
Syntax
→ rm_-r_object name
Ex: rm -r folder

CentOS Installing

About CentOS ( Community Enterprise O/S )

The CentOS Project
The CentOS Project is the name of the Organization that produces CentOS. They are not a part of any other organization.

Step - 1


The installation procedure is typical RedHat, simple and straightforward. Boot your computer from the CentOS 5 CD 1 or DVD and press Enter on the CentOS 5 boot up screen. This will install CentOS 5 in graphical mode.

Step - 2


Choose Skip in the CD Found window. This will skip the CD media test. If you click on the OK, You will have the option to check the media for defects and errors before installing. Not a bad idea, in general.

Step - 3


After a short time, the installation will begin. Click Next to go forward.

Step - 4


Choose a language and click Next.

Step - 5


Choose a keyboard Layout for the system and click Next.

Step - 6


This Step you must do carefully. Click Next and answer Yes on the Warning window.

Minimum Partitions for installing Linux
  • Swap Partition - to improve performance of the O/S (Virtual Memory)
  • Root Partition (/) - to keep the boot files and Linux kernel, to install the O/S, to install application software, to keep personal data.
Creating Minimum Partitions
»» Creating a SWAP partition
- No Mount Point

New → Select SWAP as a file system → Select partition Size

If your RAM in the PC less than 2GB, give the SWAP 2 times of your RAM capacity (Ex: 512MB RAM → 512 × 2 = 1GB)

Since we are only going to create minimum partitions. We can give the rest of the Hard Disk Drive space to the root partition.

»» Create Root partition
- / (root) mount point

New → select / (root) as a mount point → select ext3 as file system type → select partition size


This is the final result

Step - 7


Select automatically via DHCP
( you can configure network settings later)

Step - 8


Choose a region in the map. If the system clock is set to your local time.

Step - 9


Specify a strong password at least six characters long. Click Next when you done.

Step - 10


Select packages what you want to install.

Step - 11


Click Next to begin installation.

Step - 12


Congratulations, the installation is complete. Remove the CD and click Reboot to proceed to configuration.